11 December 2024
In today’s blog-post, I will be going trough how you can start your own journey of developing and testing trading bots! 🤩
Stock trading means buying and selling shares in companies to try and make money based on the price changes.
Switch stock with crypto and you end-up with the same definition.
As trading strategies may involve placing and configuring multiple trades per minutes or even second, leveraging trading bots to automate this process comes in very handy for a lot of people!
To a certain extend, it even removes the emotional part of trading, which is, in a lot of cases, separating the great from the bad traders!
This is your testing environment. Bigger crypto exchanges, like Binance, offer it as a tool for us to test our strategies and not lose our hard earned money!
Its goal is to mimic a real trading environment, but use `fugazi` money. 💸 (fake money)
Setting Up The Environment
Now, lets go on to develop our first trading bot, run it on the Binance Testnet and see what it can do with a 15,000$ crypto wallet! 🤑
I will be using VisualStudio Code as an IDE for this project.
Feel free to use PyCharm or any other development platform!
Next up, configure your Binance Testnet account. Here is a step-by-step guide on how to do it! 👇
🚨 Important before going to the Binance documentation:
- Your Testnet account is separate from your real one! This means you would need to register (Sign-Up) first and then Sign-In w/h your new account in future.
- You will have 15,000 $ in your Testnet account balance 🤑
- There are Spot & Futures Testnets.. each having their own
API_KEY&API_SECRET!
API_KEY & API_SECRET for your testnet account.Write me a message or comment and I will make sure to find time and help you if you struggle to do the above! 💪
We will be creating a Binance Futures Trading Bot, utilizing moving averages, a popular tool among traders for identifying trends.
We will be using the Simple Moving Average (SMA) crossover strategy, where you buy (go long) when a short-term moving average crosses above a long-term moving average, and sell (go short) when the opposite occurs.

from binance.client import Client # pip install python-binance
from binance.enums import *
import pandas as pd # pip install pandas
import numpy as np # pip install numpy
You can install all of them with pip install <library-name>
Very important here -> Use your Testnet API_KEY & API_SECRET, not your main accounts as it won’t work with them!
API_KEY = '<You generated this in the Testnet Config Step above>'
API_SECRET = '<You generated this in the Testnet Config Step above>'

client = Client(api_key=API_KEY, api_secret=API_SECRET, testnet=True)
‼️ Be careful where and how you store your API keys & secrets.. even for the Testnet account, always make sure you use some tool like dotenv and store them locally, not publicly on GitHub! 😅
# Function to fetch candlestick data:
def fetch_data(symbol, interval, lookback):
    bars = client.futures_historical_klines(symbol, interval, lookback)
    df = pd.DataFrame(bars, columns=['timestamp', 'open', 'high', 'low', 'close'])
    df['close'] = pd.to_numeric(df['close'])
    df['timestamp'] = pd.to_datetime(df['timestamp'], unit='ms')
    return df[['timestamp', 'close']] # We return only what we'll need from the data

# Main strategy logic & execution 👇
def sma_strategy(symbol='BTCUSDT', interval='1h', short_window=50, long_window=200, lookback='30 days ago UTC'):
    data = fetch_data(symbol, interval, lookback)

    data['short_sma'] = data['close'].rolling(window=short_window).mean()
    data['long_sma'] = data['close'].rolling(window=long_window).mean()

    # Assuming you're starting without an open position
    in_position = False

    # Check for SMA crossover
    # If SMA crosses LMA Going short on the crypto)👇
    if data['short_sma'].iloc[-2] < data['long_sma'].iloc[-2] and data['short_sma'].iloc[-1] > data['long_sma'].iloc[-1]:

        if not in_position:
            print("Signal to BUY!")
            order = client.futures_create_order(symbol=symbol, side='BUY', type='MARKET', quantity=0.01)
            in_position = True
            print(order)

    # If LMA crosses SMA (Going short on the crypto) 👇
    elif data['short_sma'].iloc[-2] > data['long_sma'].iloc[-2] and data['short_sma'].iloc[-1] < data['long_sma'].iloc[-1]:

        if in_position:
            print("Signal to SELL!")
            order = client.futures_create_order(symbol=symbol, side='SELL', type='MARKET', quantity=0.01)
            in_position = False


if __name__ == '__main__':
    sma_strategy()
I won’t go into too much detail as this is a basic strategy and the code, although it may look complex, is not hard to understand!
The most important thing to know is, when a crossover between moving averages occurs, we execute short or long futures order on the Binance Testnet!

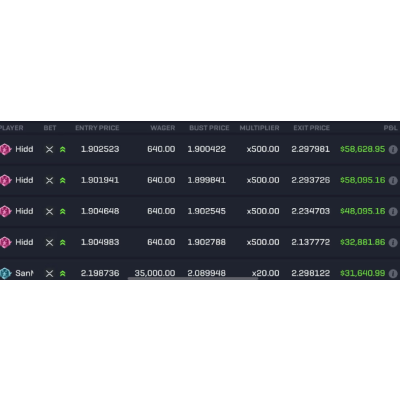
At the bottom, you will see the Open Orders, which are still not executed, because they haven’t met the prices I’ve set for them.


 BTC
BTC ETH
ETH USDT
USDT USDC
USDC TRX
TRX